


Previously apologize if this new article I created. Because I'm sure all readers actually have a lot of far more schools of or skilled in using joomla. I write this because there are some requests from friends who still do not understand about joomla and want to learn about joomla, ranging from initial installation process.
And I write the following step - joomla 1.5.8 installation steps.
1. First extract the master Joomla into localhost.
2. Open your browser and then type in addresnya http://localhost/phpmyadmin/ (make sure you have installed the first web server on your computer. Can use xampp, Wamp, etc., if you know bellum installasinya process you can click here to find out the installation process web server)
3. Create a database to store the reply function data2 yg all included in your site.
4. Once finished creating the database, and then type in addresbar http://localhost/my_web/
5. Select language, then click next.
6. Then click the next button so on until you are asked to fill in the configuration database as follows:
Database name: mysql
Host name: localhost
User name: root
Password: (blank only)
Database name: web_saya (in accordance with the database name reply has been made in step 3 above).
When finished click the next button.
7. After that click the circle No to Enable FTP File System Layer (for file system windows). Then click the next button.
8. In the main configuration window, fill out the following:
Site name: You decide, for example Information Technology & General Education.
Confirm the admin e-mail address and password
Your e-mail: write your email address.
Admin Password: password written reply you want.
Confirm Admin Password: repeat the write password you created earlier reply.
Load Sample Data, restore, or migrate back up content
Choose the default option, and click install sample data. Wait until there is a statement Succesfully Sample data installed!, And then click the button after the next.
9. Installation process has finished, but we can not go to the page we have joomla installed reply if there is directory INSTALLATION. This system is the security consideration of joomla.
10. We must remove the installation directory in the c:\Wamp\www\my_web.
learn more... Joomla! 1.5: A User's Guide: Building a Successful Joomla! Powered Website (2nd Edition)

Showing posts with label BASIC WEB PROGRAMMING. Show all posts
Showing posts with label BASIC WEB PROGRAMMING. Show all posts
Friday, October 23, 2009
Joomla 1.5.8 Installation Guide


Wednesday, September 23, 2009
How to Install Web Server WAMP 51.7.0 Illustrated step by step
More article... Windows Apache Web Server Configuration: Installation Guide for Apache 2.0.x Web Server - WAMP
Installation steps WAMP 51.7.0 are as follows:
1. Open Explorer and locate the file where WAMP 51.7.0.exe
2. Double click the file to start the 51.7.0.exe WAMP installation process such as figure 1:

Picture 1. Double click file WAMP 51.7.0.exe
3. Then will come the setup-WAMP5. Select Next
 Figure 2 Wizard setup
4. Then came the dialog box. select I accept the agreement then click next Gambar 3. Licensee agrement
5. Then the dialog box will appear, to determine the folder where it will be stored .. after that click next
 8. Masukan nama folder tempat menyimpan nama website. Default nama foldernya adalah www seperti gbr 9 Lalu klik ok
 9. Enter the server name diapakai. If the server is diapakai used computer let the default (localhost) is used see fig 10
10. Enter the email address that will be sent news from the PHP (to be borne / default)


13. If you run the lower right corner (sys tray icon) you will find the symbol of WAMP 51.7.0.exe like fig 14, or if it appears such as gb. 15 means there are unheard-way service (no red color on the WAMP icon) Figure 14 WAMP5 on (on)
 Figure 15 WAMP5 off (off)
14. Try right click on the icon wamp5 the image will appear as 16, while if the left click on the server wamp5 image will appear as it 17dari you can select Start all services to start to activate it.


15. Now we try to run the server using your favorite browser (or the existing browser - IE / Modzilla). The way of typing localhost in the address bar will display like fig 18
 Figure 19 php info

 Figure 21 Location of Storage Database and Website that we make.
 Gambar 3. Licensee agrement

Gambar 4. Destination Location

Figure 5 Name the shortcut in start menu
7. Option appears to automatically start when the computer is turned on WAMP5. Choose a sign √ to select. Continue by clicking the Next button

Figure 6 WAMP will road during startup
After that click install ... ... ... ... ..

instalasipun process begins ...

 9. Enter the server name diapakai. If the server is diapakai used computer let the default (localhost) is used see fig 10

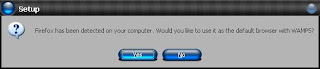
11. If the browser is more than 1 then the question will arise for the default browser on WAMP5 as fig 12. Select Yes

12. Select Launch WAMP5 now to immediately start running service in WAMP, and then press the Finish button

 Figure 14 WAMP5 on (on)
 Figure 15 WAMP5 off (off)
14. Try right click on the icon wamp5 the image will appear as 16, while if the left click on the server wamp5 image will appear as it 17dari you can select Start all services to start to activate it.

Figure 16 Right-click on wamp5

Figure 17 Click on the left wamp5

Figure 18 http://localhost/
16. To see the version of PHP or PHP info type localhost / info.php on the address bar will display as picture 19.
 Figure 19 php info
17. To design the database and click on phpmyadmin will appear as a picture 20 or the address bar you can type localhost / phpmyadmin and ENTER.

Figure 20 View phpmyadmin with original theme
 Figure 21 Location of Storage Database and Website that we make.
Learn more...
Windows Apache Web Server Configuration: Installation Guide for Apache 2.0.x Web Server - WAMP
Readmore....
